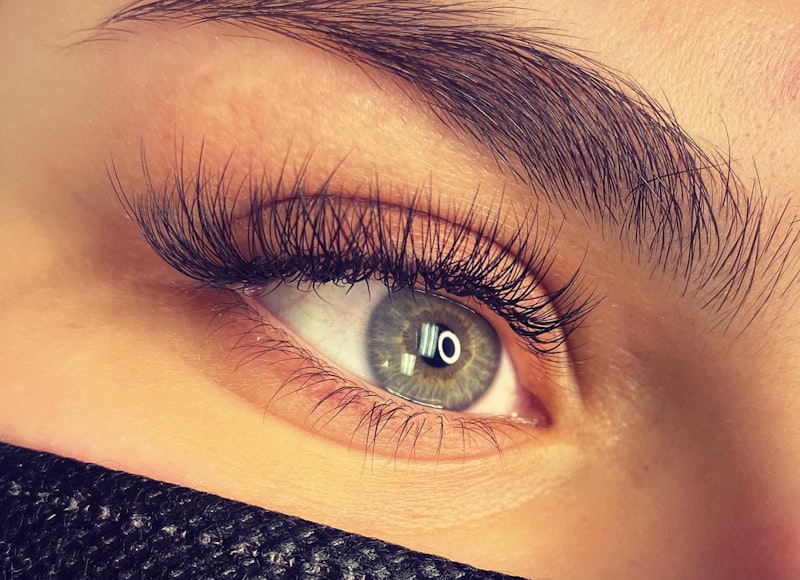
How Do Magnetic Lashes Look So Natural? A Full Application Tutorial
A step-by-step tutorial for applying magnetic lash extensions for a natural, salon-quality finish, plus tips for making them last longer.
By Rita Almusa, Licensed Master Esthetician — 20+ years of experience
Introduction
Magnetic lash systems solve a lot of the problems people have with traditional strip lashes and lash glue — no messy adhesive, easier removal, and often a more natural, lash-by-lash finish rather than one uniform strip. But the “natural” part depends entirely on application technique, which is what this tutorial actually walks through, unboxing and application included.
How Magnetic Lash Systems Work
Rather than a single strip lash with magnets embedded along one uniform band, systems like the Lashify Lash System use individual or small clustered lash “wisps” with a tiny magnetic base that attaches to a thin magnetic liner applied along your lash line. This clustered approach is part of why the finished look reads as more natural than a traditional full strip — you’re building coverage in sections rather than committing to one uniform shape across your entire lash line.
What’s Typically Included in a Magnetic Lash Kit
- A magnetic liner or base product, applied like eyeliner along your lash line
- Multiple lash wisps or clusters in varying lengths
- An application tool (tweezers or a specialized applicator)
- Often a lash sealant or bonding product for extended wear
Step-by-Step Application Tutorial
1. Prep Your Natural Lashes
Curl your natural lashes and apply a light coat of mascara if desired — this gives the magnetic wisps something more textured to grip onto and helps everything blend together more seamlessly.
2. Apply the Magnetic Liner
Apply the magnetic base product along your upper lash line, as close to the roots as possible, the same way you’d apply liquid eyeliner. Let it dry according to the product’s specific instructions before moving to the next step.
3. Start With the Outer Corner
Using the application tool, place your first lash wisp at the outer corner of your eye, angling it to follow your natural lash line’s curve.
4. Work Inward in Sections
Continue placing wisps moving toward the inner corner, slightly overlapping each new piece with the one before it to avoid visible gaps between sections.
5. Vary Wisp Length for a Natural Gradient
Using shorter wisps toward the inner corner and longer ones toward the outer corner creates a more natural, lifted shape than using uniform-length pieces across the entire lash line.
6. Press Gently to Secure
Once each wisp is placed, press gently along the base to ensure a secure magnetic connection — a loose attachment is the most common reason lashes shift or lift during the day.
7. Blend With Mascara if Needed
A very light coat of mascara over both your natural and applied lashes can help everything blend together into one cohesive lash line, though many people skip this step if they’re happy with the finish as is.
What Makes the Look Read as Natural
The natural effect comes down to two things: varying the wisp lengths rather than using one uniform length across your whole lash line, and placing the magnetic liner as close to your natural lash roots as possible so there’s no visible gap between your real lashes and the applied ones. Skipping either of these steps is what tends to make magnetic lashes look more obviously “false.”
Magnetic Lashes vs. Strip Lashes vs. Extensions
- Strip lashes use a single glued band, applying the fastest but generally looking the most uniform and least like your own natural lash line.
- Magnetic lashes offer a middle ground — faster than professional extensions, reusable, and capable of a more natural finish than strip lashes when applied in varied-length sections.
- Professional lash extensions offer the most natural, longest-lasting result since they’re applied individually to your actual lashes by a trained technician, but come with a higher cost and ongoing maintenance appointments.
Magnetic systems are a genuinely reasonable middle option for anyone who wants a more natural look than strip lashes without the ongoing commitment and cost of professional extensions.
The Beauty Tips Guide
20+ years as a Licensed Master Esthetician and Makeup Artist, condensed into one guide.
Common Mistakes to Avoid
- Using uniform-length wisps across the entire lash line. This is the fastest way to look like you’re wearing a strip lash rather than natural extensions.
- Applying the magnetic liner too far from the lash root. Any visible gap between your natural lash line and the applied lashes undermines the natural effect.
- Rushing the liner drying time. Applying wisps before the magnetic base has properly set reduces how securely they’ll hold.
- Overlapping wisps too much or too little. Too much overlap creates obvious clumping; too little leaves visible gaps between sections.
Choosing Wisp Lengths for Your Eye Shape
- Almond or round eyes: A balanced gradient from shorter inner-corner wisps to longer outer-corner pieces flatters most eye shapes without needing much adjustment.
- Hooded eyes: Slightly shorter wisps overall tend to look more proportional, since longer lengths can appear to overwhelm a hooded lid when eyes are open.
- Downturned eyes: Concentrate extra length at the outer corner specifically, which helps create a subtle lift that counters the eye’s natural downward angle.
How Long Do Magnetic Lashes Typically Last?
With proper application and care, a single set of magnetic lash wisps can often be reused multiple times before needing replacement, which is a genuine advantage over daily disposable strip lashes. Removal is generally easier too — gently sliding the wisps off rather than peeling adhesive-bonded lashes, which reduces stress on your natural lashes over repeated use.
Pro Tips
- Practice on one eye at a time rather than trying to do both simultaneously, especially your first few times using the system.
- Store wisps carefully after removal — most kits include a case, and reusing wisps depends on keeping them clean and undamaged between uses.
- Fill in sparse brows before your lashes — well-groomed brows, using something like an Anastasia Beverly Hills Brow Wiz, help frame the eye and balance out a fuller lash look.
- Clean the magnetic liner applicator regularly to keep application smooth and precise over repeated uses.
Frequently Asked Questions
Are magnetic lashes damaging to natural lashes? Generally, they’re considered gentler than traditional glue-based strip lashes or lash extensions, since there’s no adhesive bonding directly to individual natural lashes, but any repeated eye-area product use should still be done with reasonable care.
Can I wear magnetic lashes with regular makeup? Yes — apply your eye makeup as usual, then add the magnetic liner and lashes as your final step, since the liner needs to sit directly on clean lash-line skin to adhere properly.
How do I remove magnetic lashes without damaging them? Gently slide them off in the direction of your lash line rather than pulling upward or outward, which helps preserve the wisps for reuse and is more comfortable than a pulling motion.
Conclusion
Magnetic lashes can look genuinely natural, but it comes down to application technique — varying wisp length and placing your magnetic liner close to your natural lash root are the two details that make the biggest difference. Watch the full unboxing and application tutorial above to see the complete process, and give yourself a little practice time before your first big event with them. ✨
Related Posts

Natasha Denona Diamond & Blush Palette: Unboxing and First Impressions
A Certified Makeup Artist unboxes and swatches the Natasha Denona Diamond & Blush Palette, with honest first impressions on pigment, blendability, and shade range.
Too Faced Pretty Rich Palette Unboxing + NARS Foundation First Impressions
A Certified Makeup Artist unboxes the Too Faced Pretty Rich eyeshadow palette and tries a new NARS foundation, building a complete look from first impressions.

Bronze Soft Glam Makeup That Makes You Look Radiant
A step-by-step bronze soft glam makeup tutorial for a warm, radiant, dewy finish — easy enough for everyday wear, glam enough for a night out.

This Fall Makeup Look Works on Everyone: A Get-Ready-With-Me Tutorial
A versatile, easy fall makeup look that flatters every skin tone and eye shape — a full get-ready-with-me tutorial from base to lips.